Command-line interface for the Black Box ToolKit v3

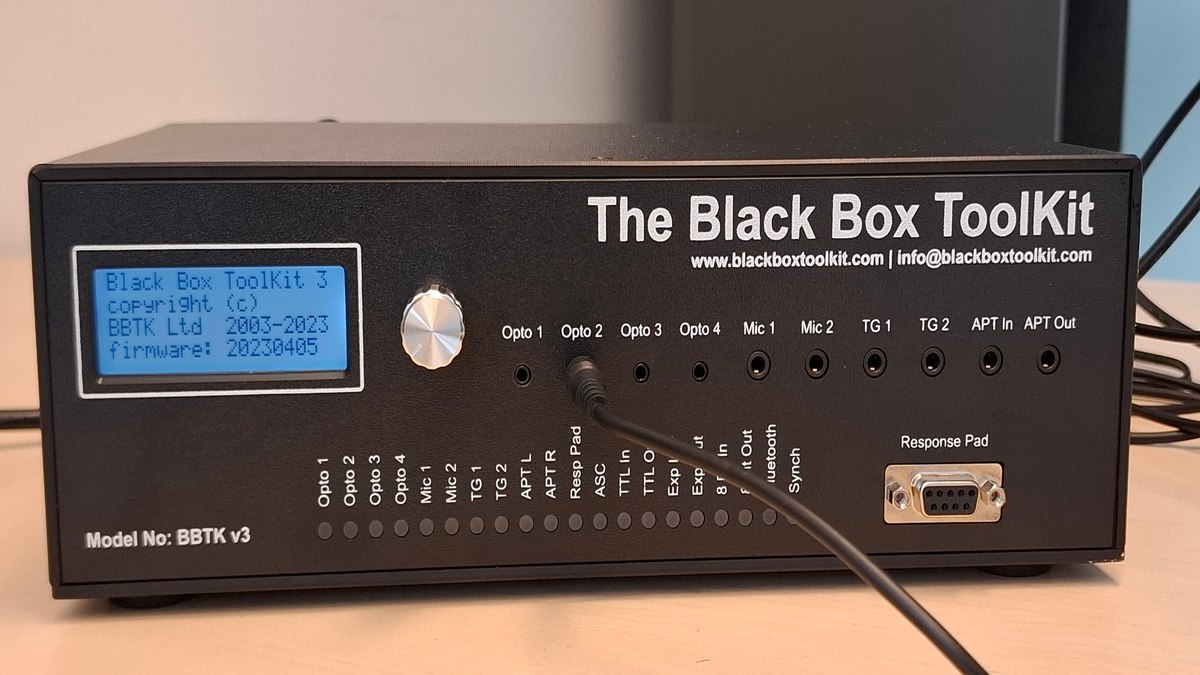
The Black Box ToolKit is a device that allows psychologists to measure the timing of audio-visual stimuli with sub-millisecond accuracy. It replaces a digital oscilloscope, capturing activity on sound and visual sensors and TTL signals, and a signal generator, generating sounds or TTL signals.
This repository contains a set of command-line tools that run under macOS, Linux or Windows (see https://github.com/chrplr/bbtkv3/releases), and control the BBTKv3, allowing to automate the collection of timing data. A paper describes these tools.
The source code (under a GPL-3.0 License) is at https://github.com/chrplr/bbtkv3. Instructions for compilation are provided below.
These programs relies on a Go module, github.com/chrplr/bbtkv3, which
encapsulates a subset of the commands documented in The BBTKv2 API
Guide. This go module can be used to drive the BBTK from programs
written in Go.
| Tool | Description |
|---|---|
bbtk-detect-port |
Scans serial ports to locate the connected BBTK |
bbtk-capture |
Captures events for a given duration (-d) with a given smoothing mask (-s) and exports them to .dat, -dscevents.csv, and -events.csv files |
bbtk-input-check |
Streams live input state from the device (ICHK); press Esc to stop |
bbtk-event-marking |
Configures and runs the command-event marking program on the device; press Esc to stop |
bbtk-trigger-response |
Loops in firmware: waits for a trigger input, then pulses an output line after a delay (drives the Robotic Key Actuator); press Esc to stop |
bbtk-adjust-thresholds |
Opens the interactive sensor threshold adjustment menu on the device |
bbtk-get-thresholds |
Reads and prints the current sensor thresholds |
bbtk-set-thresholds |
Writes eight threshold (sensitivity) values to the device |
bbtk-set-smoothing |
Sets the smoothing mask from a required six-value argument |
bbtk-send-break |
Sends the break character to stop whatever the device is running — the recovery tool for a box left streaming |
bbtk-send-command |
Reads raw protocol commands from stdin, sends each to the BBTK, and prints responses to stdout |
get-serial-port-list |
Lists all available serial ports on the host machine |
ibbtk |
Interactive menu-driven shell — keeps a persistent connection and exposes all of the above in a nested menu |
events-stats |
Computes descriptive statistics, ASCII histograms, and a Markdown report with PNG histogram and timeline plots from the -events.csv files produced by bbtk-capture
|
Principle of operation
To operate, three pieces of equipement are needed:
- A stimulation device (typically a computer, but not necessarily)
- The BBTK with input sensors (photodiodes, sound detectors, TTL detectors) linked to the stimulation device.
- A host computer driving the BBTK (linked to it via a USB cable).
 The stimulation PC and the host PC can be the same computer The stimulation PC and the host PC can be the same computer |
|---|
As data are recorded asynchronously by the BBTKv3, it is possible for a single PC to switch the BBTKv3 into “capture mode”, launch the stimulation program and, when done, download the timing data from the BBTKv3 memory.
Typical session
Three steps, in this order. The middle one is the one that decides whether your data mean anything.
1. Set smoothing
Smoothing tells the device to ignore short transitions. Without it, a CRT
reports an event on every refresh; with it, each recorded duration on a smoothed
channel is about 20 ms too long (the DurationCorrected column takes that back
off).
bbtk-set-smoothing 1,1,0,0,1,1 # mics + Opto1/Opto2 smoothed, Opto3/Opto4 raw
Do this first, because thresholds must be tuned with smoothing already in force.
Note that bbtk-capture programs its own mask at the start of every capture, so
pass the same value there with -s when you get to step 3.
2. Set thresholds, using your real stimuli
Thresholds are sensitivities, not trigger levels: the HIGHER the value, the more sensitive the sensor.
Tune them against the actual stimuli of the experiment — same display, same brightness, same loudness, same sensor placement, same room lighting. A threshold tuned on a white test square tells you nothing about a dim grey one.
Raise each channel's sensitivity until it starts reporting events that are not there (false alarms), then back off to just below that point. That gives the most sensitive setting that still discriminates, which is what catches faint or brief stimuli without inventing them.
bbtk-adjust-thresholds        # interactive, on the device's own display
bbtk-get-thresholds           # read back what you arrived at — record it
bbtk-set-thresholds 63,63,32,32,80,80,80,80   # or write values directly
Watching a channel while you adjust it is easiest with bbtk-input-check, which
streams the live state of all 12 input lines until you press Esc.
3. Capture
bbtk-capture -d 120 -s 1,1,0,0,1,1 session1
This writes session1-001.dat, session1-001-dscevents.csv and
session1-001-events.csv, and prints the smoothing mask and the thresholds it
found on the device — so every capture carries a record of the settings it was
made under. Analyse the result with events-stats.
It is possible to pass the stimulation program as a command line
argument to bbtk-capture, in which case this program will be launched just after
the capture starts.
Usage
You must first open a Terminal (e.g., under Windows, start cmd or Powershell).
Provided the tools are in the PATH (see below), you can just type:
$ bbtk-capture -d 120 session1
...
which launches a 2-min acquisition with output files named session1-001.dat,
session1-001-dscevents.csv, and session1-001-events.csv. The sequence number
is incremented automatically (-001, -002, …) so previous recordings are
never overwritten.
You do not normally have to say which serial port the device is on: every tool
finds it by itself, through the /dev/serial/by-id/*BBTK* symlink on Linux and,
failing that, by scanning the serial ports. bbtk-detect-port runs that scan on
its own, which you need only if you would rather name the port once and skip the
scan on every command:
$ bbtk-detect-port
Scanning [COM3 COM4] for a BBTK...
BBTK found at COM4
$ set BBTK_PORT=COM4
$ bbtk-adjust-thresholds
$ bbtk-capture -d 120 session1
...
Note that the scan identifies the device by opening every serial port and
sending CONN, so it disturbs whatever else is attached; give bbtk-detect-port
a port list (bbtk-detect-port COM3 COM4) to narrow it, and set BBTK_PORT to
stop the other tools from scanning at all. See Selecting the serial port below.
bbtk-capture -h
will yield some help:
Usage: bbtk-capture [options] <basefilename> [-- command [args...]]

Options:
  -D	Debug mode
  -V	Display version
  -b int
    	baudrate (speed in bps) (default 115200)
  -d int
    	duration of capture (in s) (default 30)
  -no-countdown
    	Disable second-by-second countdown display
  -p string
    	device (serial port name); overrides BBTK_PORT (default: autodetect)
  -s string
    	smoothing mask: six 0/1 values, mic1,mic2,opto4,opto3,opto2,opto1 (default "1,1,0,0,1,1")

Smoothing (-s): six 0/1 values, 1 enabling smoothing on that channel, in the
device's own order — mic1,mic2,opto4,opto3,opto2,opto1, the Opto channels
running DOWNWARDS. Smoothing suppresses spurious edges (without it a CRT reports
every refresh) at the cost of roughly 20 ms added to each recorded duration on
the channels it covers; the DurationCorrected column of -events.csv takes that
back off. TTLin and the keypad are never smoothed.

Output files: <basefilename>-001.dat, <basefilename>-001-dscevents.csv, <basefilename>-001-events.csv
Sequence number is incremented automatically to avoid overwriting previous recordings.

Anything after -- is run as a child process, started the instant the device
begins recording. Progress then moves to stderr so stdout carries only the
child's output. A child that exits non-zero aborts the capture.
The -events.csv columns
One row per detected event, sorted by onset, times in milliseconds:
| Column | Meaning |
|---|---|
Type |
Input port the event was seen on (Opto1, Mic1, TTLin1, …) |
Onset |
Time from the start of the capture to the leading edge |
Duration |
Time the line stayed high, exactly as recorded by the device |
DurationCorrected |
Duration with the smoothing tail removed — see below |
DurationCorrected exists because smoothing holds a channel high past the true
falling edge, so a recorded duration on a smoothed channel is the stimulus plus
a fixed tail of roughly 20 ms. The correction subtracts that tail on the
channels covered by the smoothing mask actually programmed into the device, and
clamps at zero rather than going negative. Channels without smoothing — TTLin
and the keypad are never covered — repeat the recorded value, so the two columns
agree wherever no correction applies.
Onsets are not corrected: smoothing does not delay the leading edge, only extends the tail, so onset latencies need no adjustment.
Duration is never altered, which keeps captures taken before this column
existed directly comparable and lets a mistaken offset be undone. The 20 ms
figure is a measurement on one device, not a constant of the hardware —
DefaultSmoothingDurationOffsetMs in SmoothMask.go records how it was
obtained, and anyone who needs it tighter should re-measure on their own box.
Two caveats:
-
events-statsreads theDurationcolumn, so its statistics are of uncorrected durations. Onset, jitter and SOA figures are unaffected. - The
capture runsub-command ofibbtkwrites the three historic columns only, withoutDurationCorrected. Usebbtk-capturefor the fourth column.
Tools reading these files should look columns up by header name rather than by
position, as events-stats does; that is what made adding the column safe.
Running a stimulus inside the capture window
A stimulus has to start after the device is recording and finish before the
window closes. Startup takes 11–40 s — a fixed floor of command pacing, plus an
internal-memory erase whose duration depends on whether the box needs a full
format (FRMT;) or only an erase of used sectors (ESEC;) — so that instant
cannot be predicted, only waited for.
The simplest way is to let bbtk-capture start the stimulus itself. Everything
after -- is its argv:
bbtk-capture -d 120 session1 -- ./my-stimulus-program -cycles 1000
No shell is involved, so there are no quoting rules and a stimulus flag such as
-d cannot be mistaken for one of bbtk-capture's.
In this mode:
-
Progress moves to stderr, so stdout carries only the stimulus's own output.
2>capture.log >results.txtkeeps the two apart; the stimulus's stderr is inherited and so joins the capture log. -
The countdown and the Esc/Ctrl-C handler are off. The terminal belongs to
the stimulus: raw mode would clear
ISIGandONLCRfor it too, costing it Ctrl-C and staircasing its output. Ctrl-C still stopsbbtk-captureviaSIGTERM/SIGINT, and a fullscreen SDL stimulus keeps its own Esc, which it reads from the display server rather than this terminal. -
A stimulus exiting non-zero aborts the capture and saves nothing. The
recording is uninterpretable without a stimulus that ran to completion, and an
aborted capture cannot be salvaged in any case (see below), so there is nothing
to weigh against freeing the device for the retry. Its exit status is
propagated, so
$?reports what actually failed. -
A stimulus still running when the window closes gets
SIGTERM, thenSIGKILLafter 5 s — but the data is still downloaded and saved. The window ran its full length, so the recording is complete and valid; only the exit status marks the mismatch. Raise-d, or shorten the stimulus, and re-run.
tests/Timing-Tests/run-timing-tests.sh in the
goxpyriment repository drives its
photodiode steps this way, gated behind BBTK_CAPTURE=1.
Driving a capture from another program
When the stimulus cannot be a child process — it is already running, or the
driver is Python, or the two are on different machines — synchronise on the
marker instead. bbtk-capture prints it on stdout, on its own line, at the exact
moment the device starts recording:
BBTK-CAPTURE-READY duration=120
Nothing earlier in the output identifies that instant: the Capturing events (with DSCM) for N seconds... message is printed roughly 5.7 s before
recording begins, because the DSCM / TIML / duration / RUDS sequence and its
pacing sleeps still have to run. Wait for the marker rather than sleeping a fixed
amount — the startup time is variable, as above.
A wrapper can check for marker support before touching the device: -V
advertises it, so a binary predating it is caught immediately instead of
stranding the caller for the whole ready-timeout.
$ bbtk-capture -V
Version: v1.0.18  Build: 9de6879
ready-marker: BBTK-CAPTURE-READY
A minimal wrapper:
bbtk-capture -d 120 -no-countdown session1 </dev/null >capture.log 2>&1 &
BBTK_PID=$!
until grep -q BBTK-CAPTURE-READY capture.log; do
    kill -0 $BBTK_PID 2>/dev/null || { echo "capture died"; exit 1; }
    sleep 1
done
./my-stimulus-program          # runs inside the capture window
wait $BBTK_PID                 # files are written when bbtk-capture exits
Redirect stdin from /dev/null. bbtk-capture puts the terminal into raw mode
to watch for Esc, and that terminal is shared with the stimulus program; with
stdin closed the raw-mode call fails harmlessly and the stimulus keeps its own
input handling. (With -- this is handled for you — the raw-mode call is skipped
outright.)
Interrupting a capture
An interrupted capture is lost. The BBTK holds its timing data in internal
RAM and streams it only when the programmed TIML window completes; there is no
command that stops a run early and still returns what has been recorded so far.
Stopping is therefore worth doing only to leave the device idle and ready for the
next capture — never to salvage data.
Esc and Ctrl-C both stop a capture, as does SIGTERM. On any of them
bbtk-capture sends the break, drains the port so stray bytes do not
desynchronise the next session, reports that the recording is gone, and exits
non-zero. It does not pretend to have saved anything.
Note that while a capture is running and stdin is a terminal, Ctrl-C is not a
signal: watching for Esc requires raw mode, which clears ISIG, so Ctrl-C
arrives as a plain byte. It is read as a stop request and takes the same path as
Esc. The SIGINT handler still covers the setup phase, before raw mode is
entered, and any run whose stdin is not a terminal.
The practical consequence: work out the capture duration in advance. A run that turns out too short cannot be extended, and one that is interrupted has to be repeated from the start.
Selecting the serial port
Every tool resolves the port in this order:
- the
-pflag, -
BBTK_PORT, - autodetection.
Autodetection tries the udev by-id symlink /dev/serial/by-id/*BBTK* first, and
falls back to scanning: opening every serial port, sending CONN, and taking
the one that answers BBTK;. Scanning is last because it writes to every serial
port on the machine, disturbing whatever else is attached; it announces itself on
stderr, so an unexpected scan is visible. A silent port costs one second, and the
ports are probed in parallel.
The by-id name is derived from the device's USB descriptors, so — unlike
/dev/ttyUSBn, which is handed out in enumeration order — it survives replugging
and power-cycling. In practice the numbering shifts exactly when you have just
rebooted a wedged box and least want to hunt for its new name, so leaving -p
and BBTK_PORT unset is usually the most reliable option on Linux.
bbtk-detect-port runs the same scan explicitly, over the ports you name or
over all of them, and reports every BBTK it finds rather than just the first.
BBTK_PORT can be set once per session, and is used by every tool that takes
-p:
export BBTK_PORT=/dev/ttyUSB0          # Linux
export BBTK_PORT=/dev/cu.usbserial-BBTKXXXX  # macOS
set BBTK_PORT=COM4                     # Windows (cmd)
The by-id step is Linux-only — /dev/serial/by-id is a udev creation, so on
macOS and Windows autodetection means the scan. That works without configuration,
but setting BBTK_PORT avoids probing the other serial devices on the machine.
On macOS the FTDI serial number is already part of the device name
(/dev/cu.usbserial-…); the scan skips the /dev/tty.* twins, which block on
open waiting for DCD and are not the device to talk to anyway. On Windows the
driver keeps a given box on the same COMn.
When nothing resolves — no -p, no BBTK_PORT, no symlink, and no port
answering the scan — every tool stops with the same error rather than guessing a
device name:
no serial port specified: use -p <port> or set BBTK_PORT
bbtk-set-smoothing — choose which channels are smoothed
Smoothing tells the device to ignore short transitions on a channel. Without it, a CRT reports an event on every refresh; with it, the channel reads about 20 ms longer than the stimulus really lasted, because the line is held past the true falling edge.
bbtk-set-smoothing 1,1,0,0,1,1
The mask is six 0/1 values, 1 enabling smoothing on that channel. The
order is the device's own, and the Opto channels run downwards:
mic1,mic2,opto4,opto3,opto2,opto1
So 1,1,0,0,1,1 above smooths both microphones and Opto1/Opto2, leaving Opto3
and Opto4 unsmoothed. Commas or semicolons both work — ToString and the device
use semicolons, but those need quoting in a shell, so commas are easier to type.
The parsed mask is echoed back by channel name before it is sent:
Setting smoothing mask to {Mic1:true Mic2:true Opto4:false Opto3:false Opto2:true Opto1:true}
ok!
TTLin and the keypad are outside the mask and are never smoothed — which is why they need no duration correction.
Two things to know:
-
The setting does not survive a
bbtk-capturerun.bbtk-captureprograms its own mask at the start of every capture, overwriting whatever you set here — so for a capture, pass the mask there instead:bbtk-capture -d 120 -s 1,1,1,1,1,1 session1bbtk-set-smoothingis for setting the mask on its own, outside a capture. -
Before v1.0.21,
bbtk-set-smoothingtook no argument and silently applied a fixed mask. Scripts calling it bare now print usage and exit 1; pass1,1,0,0,1,1to keep the old behaviour.
Installation
Compiled versions for MACOSX, Windows and Linux, and intel (amd64) or arm are available at https://github.com/chrplr/bbtkv3/releases.
Each release provides one zip archive per platform, named bbtkv3-{os}-{arch}-{version}.zip, containing all the tools. Download the archive for your OS and architecture and unzip it — for example:
unzip bbtkv3-linux-amd64-v1.0.13.zip
Inside, each binary is named {tool}-{os}-{arch}-{version}. Rename them to your liking (I would strip the -OS-ARCH-VERSION suffix), and copy them to some folder listed in the PATH variable of your OS. In the examples below, replace the version number with the one you downloaded.
 Windows Windows |
|---|
In the command line terminal application, CMD, type:
cd Downloads

rem rename the executables
ren bbtk-capture-windows-amd64-v1.0.13.exe  bbtk-capture.exe
ren bbtk-adjust-thresholds-windows-amd64-v1.0.13.exe  bbtk-adjust-thresholds.exe
Then copy the new*.exe files into a folder, say /home/user/bin, and add this folder to the system's PATH environment variable (see https://www.eukhost.com/kb/how-to-add-to-the-path-on-windows-10-and-windows-11/).
Now , when you launch CMd, you should be able to execute any of these program by typing its name and pressing 'Enter'.
|
MacOS X |
|---|
Assuming that you downloaded the programs in ~/Downloads and want to install them in ~/bin:
mkdir -p ~/bin
cd ~/Downloads
for f in bbtk-* ibbtk-* events-stats-* get-serial-port-list-*; do
    chmod +x "$f"
    mv "$f" ~/bin/"$(echo "$f" | sed -E 's/-(darwin|linux|windows)-(amd64|arm64)-v?[0-9.]+$//')"
done
(the sed expression strips the -OS-ARCH-VERSION suffix, whatever the version)
|
Linux |
|---|
Make sure that you are part of the dialout group.
sudo usermod -a -G dialout $USER
Assuming that you downloaded the programs in ~/Downloads and want to install them in ~/bin:
mkdir -p ~/bin
cd ~/Downloads
for f in bbtk-* ibbtk-* events-stats-* get-serial-port-list-*; do
    chmod +x "$f"
    mv "$f" ~/bin/"$(echo "$f" | sed -E 's/-(darwin|linux|windows)-(amd64|arm64)-v?[0-9.]+$//')"
done

#run — the port is found automatically via /dev/serial/by-id
bbtk-capture -d 30 session1
ibbtk — interactive shell
ibbtk is an interactive menu-driven shell for communicating with the BBTKv3. Rather than running separate commands, it keeps a persistent connection open and lets you issue commands one by one.
Starting ibbtk
ibbtk -p /dev/ttyUSB0        # Linux
ibbtk -p COM4                 # Windows
ibbtk -p /dev/cu.usbserial-BBTKXXXX   # macOS
-p can be omitted whenever the port resolves on its own — on Linux it normally does, via the by-id symlink; elsewhere the tools scan for the box, or you can set BBTK_PORT to skip the scan. See Selecting the serial port above.
Options:
  -p string   serial port (or set BBTK_PORT)
  -b int      baudrate (default 115200)
  -v          verbose connection output
  -V          display version and exit
Command structure
Once connected, ibbtk presents a prompt. Type menu at any prompt to list available commands, and exit to leave the current level (or quit the program from the top level).
Top-level commands
| Command | Description |
|---|---|
status |
Check whether the device is alive and show firmware version |
info |
Display copyright/firmware info on the device LCD |
thresholds |
Enter the thresholds sub-menu |
smoothing |
Enter the smoothing sub-menu |
capture |
Enter the capture sub-menu |
inputcheck |
Send ICHK and stream input-state lines (type X + Enter to stop) |
outputcheck |
Send OCHK and stream output-state lines (type X + Enter to stop) |
flush |
Flush the serial output buffer |
reset |
Reset serial input/output buffers |
raw <CMD> |
Send a raw protocol command and print all response lines (stops after 1 s of silence) |
reconnect |
Purge serial buffers and re-issue CONN — use this to recover after a bad command desynchronises the dialog |
sendbreak |
Send the break character X to the device (interrupts ongoing operations) |
thresholds sub-menu
| Command | Description |
|---|---|
get |
Read the current thresholds from the device |
set <values> |
Set all eight thresholds, e.g. set 63,63,32,32,100,100,100,100 (Mic1, Mic2, Sounder1, Sounder2, Opto1–4; range 0–127) |
adjust |
Launch the interactive threshold adjustment procedure on the device |
smoothing sub-menu
| Command | Description |
|---|---|
set <mask> |
Set the smoothing mask, e.g. set 1;1;0;0;1;1 (fields: Mic1;Mic2;Opto4;Opto3;Opto2;Opto1) |
all |
Enable smoothing on all sensors (was default before v1.0.21) |
Beware: When smoothing is on for a given input line, one must subtract 20ms to durations reported by the bbtk for this input line.
capture sub-menu
| Command | Description |
|---|---|
run <seconds> [output.dat] |
Clear device memory, capture for the given duration, and save .dat, -dscevents.csv, and -events.csv files (default output name: ibbtk-capture.dat) |
clear |
Erase the device timing memory |
Example session
$ ibbtk -p /dev/ttyUSB0
Connected to BBTKv3. Type 'menu' for commands, 'exit' to quit.
ibbtk> status
BBTKv3 is alive
Firmware: 3.14
ibbtk> thresholds
thresholds> get
{Mic1:63 Mic2:63 Sounder1:32 Sounder2:32 Opto1:100 Opto2:100 Opto3:100 Opto4:100}
thresholds> set 63,63,32,32,80,80,80,80
Thresholds now: {Mic1:63 Mic2:63 Sounder1:32 Sounder2:32 Opto1:80 Opto2:80 Opto3:80 Opto4:80}
thresholds> exit
Exiting...
ibbtk> capture
capture> run 30 myexp.dat
Clearing timing data... ok
Capturing for 30 seconds...
Raw data saved to myexp.dat
DSC events saved to myexp-dscevents.csv
Events saved to myexp-events.csv (12 events detected)
capture> exit
Exiting...
ibbtk> exit
Exiting...
bbtk-input-check — stream live input state
bbtk-input-check sends the ICHK command to the device and continuously prints every line returned, showing the state of the 12 input lines (Keypad1–4, Opto1–4, TTLin1–2, Mic1–2) in real time. Press Esc (no Enter needed) to stop; the program sends the break character to the device and exits.
Options:
  -p string   serial port (or set BBTK_PORT)
  -b int      baudrate (default 115200)
  -V          display version and exit
Example
$ bbtk-input-check -p /dev/ttyUSB0
Streaming input state. Press Esc to stop.
000000000000;
000000010000;
000000000000;
000000010000;
Stopping...
Each line is a 12-bit snapshot of the input ports, terminated with ;. A 1 in a position means that sensor is currently active.
bbtk-event-marking — run the command-event marking program
bbtk-event-marking programs the BBTK to operate in event-marking mode: it sends the PDCE / STYP / PATT / TIML setup sequence together with the pattern table, commits with PCCR, and starts execution with RUEM. The device then runs indefinitely, marking command events as they occur. Press Esc (no Enter needed) to stop; the program sends the break character to the device and exits.
A one-second pause is inserted before each protocol command (matching the timing used by bbtk-capture) to give the device time to process each step.
Options:
  -p string   serial port (or set BBTK_PORT)
  -b int      baudrate (default 115200)
  -V          display version and exit
bbtk-trigger-response — answer an input event with a delayed output pulse
bbtk-trigger-response puts the BBTK into Digital Stimulus Response Echo
(DSRE) mode: the device waits for an event on the trigger input line(s), waits
-rt milliseconds, raises the output line(s) for -d milliseconds, lowers them,
and goes back to waiting — indefinitely, until you press Esc.
The loop runs entirely in the device's firmware. Once RUSR has started it, the
host plays no part in the timing, so the delay and the pulse width are not
exposed to USB latency or to the operating system's scheduler. This is the whole
reason to use it rather than a loop in your own program.
bbtk-trigger-response                       # TTLin2 → 200 ms → TTLout1 for 500 ms
bbtk-trigger-response -n                    # print the command sequence, touch nothing
bbtk-trigger-response -any                  # ignore activity on other input lines
bbtk-trigger-response -i Opto1 -rt 285 -d 105
Options:
  -p string   serial port (or set BBTK_PORT)
  -b int      baudrate (default 115200)
  -i string   comma-separated trigger input port(s) (default "TTLin2")
  -o string   comma-separated output port(s) to pulse (default "TTLout1")
  -rt int     delay from trigger to pulse onset, in ms (default 200)
  -d int      pulse duration, in ms (default 500)
  -model str  mask widths: standard (12/8) or elite (20/16) (default "standard")
  -any        respond whatever the other input lines are doing (STYP INDI)
  -n          dry run: print the command sequence and exit without opening the port
  -V          display version and exit
Input names come from the 12 input lines (Keypad1–4, Opto1–4,
TTLin1–2, Mic1–2), output names from the 8 output lines (ActClose1–4,
TTLout1–2, Sounder1–2). Naming several of either is allowed: -o TTLout1,TTLout2 pulses both at once.
As with bbtk-event-marking, a one-second pause precedes each protocol command
so the device can digest each step; expect about ten seconds between launching
the tool and the program actually running. Any reply the device sends is echoed,
prefixed with the command that provoked it. The v2 API Guide says PCCR answers
with the sequence it understood — but firmware 20230405 says nothing at all
through the whole DSRE sequence, so on a v3 expect no output here even on a run
that works. Silence is not a symptom.
Press Esc to stop. That sends the break character X, which does cleanly
stop a running DSRE program and leaves the box responsive — verified. (The v2 API
Guide claims DSRE can only be stopped by a serial break that resets the ARM chip.
On the v3 that is wrong, and a serial break does nothing useful.)
Model: use the standard 12/8 widths, even on an Elite
DSRE wants 12-bit input masks and 8-bit output masks on every model, the Elite included. That is not the obvious guess: an Elite has 20 input and 16 output lines, and the event-marking rows elsewhere in this repo really are 20 and 16 bits wide. DSRE does not follow suit.
Verified on a BBTKv3 Elite, firmware 20230405: -model standard programs
it and the response fires. -model elite is kept for the TTLe expansion lines
and is unverified — and since this tool can only name the standard lines, it
currently buys nothing.
-model |
Inputs | Outputs | Row for -i Opto1 -o TTLout1
|
|---|---|---|---|
standard (default), pro, entry
|
12 | 8 | 000000010000,999999999999,999999999999,200,00000100,500 |
elite (unverified) |
20 | 16 | 00000001000000000000,9…9,9…9,200,0000010000000000,500 |
Matching: PATT versus INDI
By default the firmware is programmed with STYP PATT, which fires only on an
exact match of the whole input port — every line in your mask high and every
other line low. If anything else on the port is active, no response is generated.
That is a silent failure and an easy one to hit on a busy rig.
-any sends STYP INDI instead, which fires when any line in the mask is active
whatever the rest of the port is doing. Reach for it when nothing happens and you
are not certain the other lines are quiet.
Driving the Robotic Key Actuator
The defaults are the RKA case. The RKA is a solenoid wired to TTL Out 1
through the 3.5 mm lead on the TTL/ASC extension port, so "press the key" is just
"raise TTLout1" — there is no separate actuator protocol. Per the Robotic Key
Actuator Guide, do not wire anything else to TTL In 1 or TTL Out 1 while the RKA
is connected.
bbtk-trigger-response -i TTLin2 -o TTLout1 -rt 200 -d 500
The trigger defaults to TTL In 2, not TTL In 1: TTL In 1 is the line the
Breakout Board's calibration button sits on, and the guide says to leave both it
and TTL Out 1 unwired while the RKA is connected. Naming TTLin1 with -i still
works — the tool only warns — but on an RKA rig it means feeding the trigger into
the calibration line.
Three things to keep in mind:
-
The RKA is mechanical, so the numbers you program are not the numbers you
get. There is a start-up latency (~15 ms in the guide's example) between the
TTL edge and the plunger actually closing the key, and the press duration comes
out a few ms short. Calibrate against the Breakout Board's calibration button
and subtract: to obtain a real 300 ms / 100 ms press, program
-rt 285 -d 105. Recalibrate whenever you reposition the plunger, and keep the air gap identical to the calibration run. -
Do not re-trigger while a response is in progress. One cycle occupies the
actuator for
-rt+-dms — 700 ms with the defaults — plus recoil time; the tool prints that figure as a reminder. Triggering inside that window gives meaningless timings and stresses the mechanism. - The documented ranges are 50–10000 ms for the delay and 50–1000 ms for the duration. Outside them the tool warns but still runs, since DSRE itself is general.
If the actuator does not move
Work down this list; it isolates the fault in about two minutes.
-
Is
-model standard? The 20/16 Elite widths do not work for DSRE, on an Elite or anywhere else. This is the mistake that cost a whole session. -
Is the trigger reaching the box?
bbtk-input-checkstreams the live input state; you should see the bit for your trigger line change. PressEscto stop. -
Is another input line active? Try
-any. See the section above. -
Is TTL Out 1 firing at all? Take DSRE out of the picture with the Output Line Check —
ibbtk→outputcheck, then00000100to latch TTL Out 1 (the RKA presses and holds) and00000000to release. The RKA guide describes this test under its F3 utility.⚠️
OCHKwedges a BBTKv3, and only a power cycle gets it back. NeitherXnor a real serial break recovers it — all three were tried. The v2 API Guide's advice to send a serial break does not work on the v3. Use this test only when you genuinely suspect the wiring or the actuator, and expect to switch the box off and on afterwards. -
Does the device reply? It does not — see above. Do not read silence as failure.
To verify the sequence itself without moving anything, run -n and check it
against section 8.1 of the API Guide, then run the real thing with the RKA's own
24 V supply switched off and watch the TTL Out 1 LED on the front panel.
bbtk-send-break — unwedge a device left streaming
bbtk-send-break
Sends the break character (X, bare, no line ending) — the BBTKv3 mechanism for
interrupting an operation such as ICHK, OCHK or a running event-marking
program — then checks that the device answers again.
You need this when one of the streaming tools was killed rather than stopped
with Esc: bbtk-input-check and bbtk-event-marking send the break character
themselves on a clean exit, but a kill, a timeout, or a closed terminal
skips that, and the device carries on streaming to a port nobody is reading. The
next tool to connect then reads that stream instead of the handshake reply:
Connect returned: Connect: expected "BBTK;", got "000000000000;"
or simply hangs. Either way, bbtk-send-break clears it:
$ bbtk-send-break
Trying to open /dev/serial/by-id/usb-BBTK_BBTK_BBTK_V3_BBTKBBTKV3-if00-port0 at 115200 bps...
ok!
Break character sent.
Trying to connect to BBTK...
ok!
bbtkv3 is alive
It does not handshake before sending the break, because handshaking is
exactly what fails on a wedged device — requiring it first would make the tool
useless in the one situation it exists for. Afterwards it purges the serial
buffers and asks for an ECHO; exit status is 0 if the device answers and 1 if
it does not, so a script can tell recovery from a box that needs power-cycling.
Use -n to send the break and skip the check.
ibbtk has the same thing as its sendbreak command, for when you are already
in the shell.
bbtk-send-command — pipe raw commands to the device
bbtk-send-command reads commands from stdin (one per line), sends each to the BBTK as a raw protocol command, and prints the device's responses to stdout. No handshake is performed automatically, so you have full control over the command sequence.
Options:
  -p string   serial port (or set BBTK_PORT)
  -b int      baudrate (default 115200)
  -timeout int  seconds of silence after last response line before moving to
                the next command (default 1)
  -V          display version and exit
Examples
# Check that the device echoes back
echo "ECHO" | bbtk-send-command -p /dev/ttyUSB0

# Full handshake then query firmware version
printf "CONN\nFIRM\n" | bbtk-send-command -p /dev/ttyUSB0

# Use the BBTK_PORT environment variable
printf "CONN\nECHO\n" | BBTK_PORT=/dev/ttyUSB0 bbtk-send-command -timeout 2
After sending each command the tool waits up to -timeout seconds for the device to stop replying before sending the next command. Increase -timeout for commands that trigger longer device operations.
events-stats — descriptive statistics on captured events
events-stats reads one or more -events.csv files produced by bbtk-capture and prints three blocks of statistics to stdout, each followed by an ASCII histogram. It also writes a Markdown report and an HTML report (by default, named after the input file) with publication-quality PNG figures. Use -no-md / -no-html to skip either one.
The three blocks are:
- Duration statistics — distribution of event durations for each sensor channel.
- Inter-onset interval (jitter) statistics — distribution of the time between successive events of the same type, measuring stimulus regularity.
-
Paired-event onset differences — for each occurrence of the reference event type (
-event1, defaultTTLin1), the tool finds the nearest following event of every other type and reports the distribution of those onset differences. This is the main measure of latency: how long after a TTL trigger was the corresponding visual or audio event actually detected by the sensor.
All time values are in milliseconds.
Usage
events-stats [-event1 TYPE] [-detect-outliers MS] [-no-md] [-no-html] <file-events.csv> [file2-events.csv ...]
Multiple files are pooled before computing statistics, which is useful when you have repeated capture sessions.
Options
| Flag | Default | Description |
|---|---|---|
-event1 TYPE |
TTLin1 |
Reference event type; onset differences are reported for every other event type relative to this one |
-detect-outliers MS |
50 |
Exclude data points more than MS milliseconds from the median (set to 0 to disable) |
-no-md |
off | Skip writing the Markdown report |
-no-html |
off | Skip writing the HTML report |
-V |
off | Print version and build, then exit |
Markdown report
By default the tool writes <basename>.md alongside the input CSV, where <basename> is the input filename with -events.csv stripped. All PNG figures are saved in the same directory with the same prefix.
The report contains:
- Percentile tables for Duration, Jitter, and paired-event onset differences.
- Log-scale histograms (log₁₀ Y axis) for each distribution — rare outlier bins remain visible even when the main peak is thousands of times taller.
- Timeline scatter plots for each event type: Duration vs. onset time and SOA vs. onset time, drawn as stick plots (vertical bars from y = 0) so isolated outliers stand out clearly.
Output format
Each statistics table has the following columns:
| Column | Description |
|---|---|
Type |
Event type (sensor channel name) |
N |
Number of data points (after outlier removal) |
Min / P5 … P95 / Max
|
Selected percentiles |
Range |
Max − Min |
P95-P05 |
90 % central interval |
Mean |
Sample mean |
SD |
Sample standard deviation (Bessel-corrected) |
Below each table, a 10-bin ASCII histogram is printed per event type. If outliers were removed, a warning of the form
Warning: N outliers detected in TYPE (> D.DDD ms away from the median): V1, V2, ...
is printed before the histograms.
Example
$ events-stats -event1 TTLin1 -detect-outliers 10 session1-events.csv

=== Duration Statistics (ms) ===

Type    N     Min   P5    P25   P50   P75   P95   Max   Range  P95-P05  Mean  SD
TTLin1  5999  5.5   21.5  21.8  21.8  22.0  22.2  54.5  49.0   0.8      21.9  0.58
Opto1   6000  25.0  26.5  27.0  27.2  27.8  28.0  62.5  37.5   1.5      27.3  0.87

=== Inter-Onset Interval / Jitter Statistics (ms) ===

...

=== Paired-Event Onset Differences relative to TTLin1 (ms) ===

Type          N     Min   P5    P50   P95   Max   Range  P95-P05  Mean  SD
TTLin1→Opto1  5998  15.8  16.2  16.8  20.3  60.8  45.0   4.0      17.2  1.69

markdown report written to session1.md
Pairing algorithm
For each event1 occurrence (sorted by onset time), events-stats locates the nearest following event of each other type using binary search. Multiple event1 events can pair with the same target event (non-exclusive), handling cases where two triggers fire before the sensor responds.
Typical workflow
# 1. Record events
bbtk-capture -p /dev/ttyUSB0 -d 60 session1

# 2. Compute statistics and generate the Markdown report
events-stats session1-events.csv

# 3. Use Mic1 as the reference instead of TTLin1
events-stats -event1 Mic1 session1-events.csv

# 4. Pool several sessions
events-stats session1-events.csv session2-events.csv session3-events.csv

# 5. Stdout only, no report files
events-stats -no-md session1-events.csv
Troubleshooting
[!WARNING] The BBTK and the host PC communicate via a serial protocol over USB. Depending on your computer, you may need to install an additional drivers to handle this.
|
Windows |
|---|
To determine the (virtual) serial port to which the BBTK is attached, check the "Ports (COM & LPT)" section of the Computer Management console.
For the BBTK v2, you may need to install a driver to communicate with the BBTK. You can install the mbed-cli available from https://os.mbed.com/docs/mbed-os/v6.16/quick-start/build-with-mbed-cli.html and check install driver during the setup.
For the BBTK v3, you may need to install the https://ftdichip.com/drivers/vcp-drivers/ following instructions at https://ftdichip.com/document/installation-guides/
|
Linux |
|---|
For the BBTK to be recognized as a serial device, the module ftdi_sio must be loaded in the linux kernel. To do so manually:
sudo modprobe ftdi_sio
The v3 uses an FTDI chip, so it appears as /dev/ttyUSBn (the v2, an mbed
board, appears as /dev/ttyACMn). You normally do not need the name: udev also
creates /dev/serial/by-id/*BBTK*, and the tools resolve that themselves. To
see what was attached anyway, run:
sudo dmesg -w
|
MacOS X |
|---|
The BBTK may appear as /dev/cu.usbserial-BBTKXXXX. The page at https://ftdichip.com/drivers/vcp-drivers/ contains drivers for various MacOS X versions.
expected "BBTK;", got "000000000000;" — the device is still streaming
A previous tool was killed instead of being stopped with Esc, so it never sent the break character and the device is still sending input-state lines. The next connection reads those instead of the handshake reply, and either fails with the message above or hangs waiting.
bbtk-send-break
clears it without needing a handshake first. See the bbtk-send-break section
above.
The tools cannot reach the BBTK: suspect the USB cable
[!IMPORTANT] A failing USB cable does not look like a failing cable. The device still enumerates far enough for the kernel to create
/dev/ttyUSB0and bindftdi_sio, so it appears connected, and the fault is easily mistaken for a bug in these tools.
The cable supplied with our BBTK v3 failed this way. Replacing it with a standard USB-B printer cable fixed it. The symptoms were:
-
sudo dmesgreports-32errors (-EPIPE, a USB endpoint stall):ftdi_sio ttyUSB0: failed to get modem status: -32 ftdi_sio ttyUSB0: usb_serial_generic_read_bulk_callback - urb stopped: -32 -
/dev/ttyUSB0exists andftdi_siois bound, so the device looks present; -
bbtk-detect-portfinds nothing, and writes to the port get no reply; -
on Linux,
manufacturer,productandserialare missing from/sys/bus/usb/devices/<dev>/.
That last point is the reliable tell: enumeration got through the device and configuration descriptors and then stalled. There was enough signal integrity to start enumerating, but not enough to finish.
On Linux, tools/ftdi-check.sh performs these checks and prints a verdict:
./tools/ftdi-check.sh # or: ./tools/ftdi-check.sh /dev/ttyUSB1
It exits 0 when the USB link is healthy — in which case the problem lies at the device or protocol level and debugging the tools is worthwhile — and 1 when the link itself is at fault, in which case swap the USB cable before debugging anything else, then try a port that is not behind a dock or a hub.
Compiling from source
You need the Go development tools.
To install all the tools at once, use the ... wildcard:
go install github.com/chrplr/bbtkv3/cmd/...@latest
The binaries are placed in $(go env GOPATH)/bin, which must be in your PATH.
Alternatively, if you prefer, you can download the github repo https://github.com/chrplr/bbtkv3 using git and build the binaries:
git clone https://github.com/chrplr/bbtkv3.git
cd bbtkv3
make build
This will generate executables in _build/.
To copy them somewhere on your PATH:
make install
This installs the tools into ~/.local/bin (creating it if needed) and warns if that directory is not on your PATH. Change the destination with PREFIX or BINDIR:
sudo make install PREFIX=/usr/local   # -> /usr/local/bin
make install BINDIR=/opt/bbtk/bin
make uninstall (with the same PREFIX/BINDIR) removes them again.
For cross-compiling:
make dist
This builds every tool for darwin/linux/windows × amd64/arm64 and packages them into binaries/bbtkv3-{os}-{arch}-{version}.zip. The version is taken from the latest git tag; override it with make dist VERSION=v1.2.3.
[!NOTE] You can set
PLATFORMSandARCHSto target a subset of OS and ARCH, e.g.:
make dist PLATFORMS=linux ARCHS=amd64
Releasing
Pushing a tag that starts with v triggers the GitHub Actions workflow in .github/workflows/release.yml, which runs the tests, builds the six zips and publishes them as a GitHub release:
git tag v1.2.3
git push origin v1.2.3
AUTHORSHIP & LICENSE
AUTHOR: Christophe Pallier christophe@pallier.org
LICENSE: GPL-3.0
If you use this software, please cite it as:
Pallier, C. (2026). bbtkv3: An Open-Source Suite for Timing Measurement and Analysis with the Black Box ToolKit v3 [Computer software]. Zenodo. https://doi.org/10.5281/zenodo.19551604
Note: that DOI is the concept DOI: it always resolves to the most recent release. To cite the exact version you used, use its own DOI instead — for example https://doi.org/10.5281/zenodo.21620779 for v1.0.13. Every release has one, listed on the Zenodo record.
Machine-readable metadata is in CITATION.cff; GitHub's "Cite this repository" button renders it in APA and BibTeX.
REFERENCES
- Plant, R., Hammond, N., & Turner, G. (2004). Self-validating presentation and response timing in cognitive paradigms: How and why? Behavior Research Methods, Instruments, & Computers : A Journal of the Psychonomic Society, Inc, 36, 291–303. https://doi.org/10.3758/BF03195575
- Plant, R. (2016). The Black Box Toolkit v2. API Guide. Revision RC4.